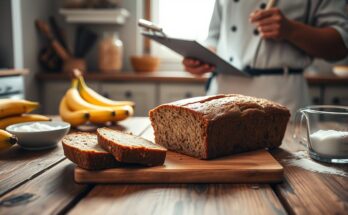
I used to be scared of flour and yeast, thinking making artisan bread needed a degree. But then, I found a simple way to make a perfect crusty bread without much effort. This changed how I bake forever.
You don’t need fancy mixers or hard folding to get great results. This no knead bread uses time, not hard work. It’s perfect for beginners and is the best easy homemade bread out there.
Looking for a classic loaf or a quick No yeast bread option? This method makes baking easy and stress-free. I’m here to show you how to do it without any special tools.
Key Takeaways
- Mastering artisan loaves requires minimal effort and basic pantry staples.
- The no-knead method eliminates the need for complex physical labor.
- Long fermentation times develop deep, professional flavors naturally.
- This forgiving technique ensures success even on your very first attempt.
- You can achieve a bakery-style crusty exterior using a standard home oven.
My Personal Journey into Home Baking
Years ago, I stood in my kitchen, staring at a bag of flour. I was terrified of ruining everything. I thought baking for beginners was a secret club, needing years of training and expensive gear. My early tries were often dense, flat, and far from the crusty loaves I admired in magazines.
I avoided the kitchen for months, fearing the kneading described in old cookbooks. I believed without perfect technique, my dough wouldn’t rise. But then, I found out that simplicity is the secret ingredient to success.
“The smell of fresh bread baking in the oven is the ultimate reward for any home cook, regardless of their skill level.”
When I focused on easy homemade bread, everything changed. I stopped chasing perfection and started enjoying the simple mixing of ingredients. This shift turned a stressful task into a relaxing hobby I look forward to every weekend.
To show how my approach changed, here’s a comparison of myths I once believed versus what I found in my kitchen:
| Common Myth | The Reality | My Experience |
|---|---|---|
| Kneading is mandatory | No-knead methods work | Much easier |
| Need fancy tools | Basic bowls suffice | Very affordable |
| Bread is difficult | Simple science rules | Highly rewarding |
If you’re feeling intimidated, know you’re not alone. Baking for beginners should be a joy, not a stress. With the right mindset, you’ll find making easy homemade bread is incredibly rewarding.
Defining What is the Easiest Bread to Make for Beginners
Many people ask me what is the easiest bread to make for beginners. The answer is simple. You don’t need a fancy kitchen or years of experience. The secret is a method that focuses on patience, not hard work.
The best recipe for beginners is a classic artisan bread. It uses just four ingredients: flour, water, salt, and yeast. These ingredients mix to create a dough that gets better with time, not effort.
The key to this method is the no-knead method. You don’t spend hours kneading the dough. Instead, you mix the ingredients briefly. Then, the dough rests for hours, letting the gluten form naturally.
When you learn what is the easiest bread to make for beginners, you see the beauty of simplicity. This method doesn’t mean you’re sacrificing quality. It’s a technique used by pros for centuries to make crusty, airy artisan bread. It sets you up for success in your baking journey.
Essential Tools for Your First Loaf
You don’t need a fancy bakery to make great loaves at home. Many beginners feel lost with all the gadgets out there. But, the truth is, simple tools often lead to the best results. I’ve found that having a few quality items makes baking more fun and consistent.

Must-Have Kitchen Equipment
To bake crusty bread, you need some basic tools. A big mixing bowl is key for mixing without a mess. A digital kitchen scale is also a must. It’s way more accurate than using cups.
The most critical tool is a heavy-duty pot. A Dutch oven is a game-changer for home bakers. It keeps steam in during baking, making the crust golden and crispy. If you don’t have a Dutch oven, a heavy stainless steel pot with a tight lid works too.
Optional Gadgets That Make Life Easier
Once you get the hang of the basics, you might want some extra tools. A bench scraper is great for handling sticky dough without mess. A proofing basket is optional but helps keep the dough’s shape during rising.
For professional-looking Dutch oven bread, a bread lame or sharp razor blade is handy. They let you control where the bread grows in the oven. Here’s a quick guide to help you pick what to buy first.
| Tool Name | Primary Function | Priority Level |
|---|---|---|
| Digital Scale | Precise ingredient measurement | Essential |
| Dutch Oven | Steam retention for crust | Essential |
| Bench Scraper | Dough handling and cleaning | Optional |
| Proofing Basket | Structural support for rise | Optional |
Understanding the Science of Simple Yeast Breads
When I started baking, I learned that knowing the science of simple yeast breads was key. You don’t need a chemistry degree to bake a great loaf. Just a basic understanding of how ingredients work together.
Learning these basics helps you fix dough problems. This way, you can make perfect loaves every time.
Why Flour and Water Matter
Flour and water are the base of any loaf. When mixed, they form gluten, a protein network. This network is what makes your bread rise.
The water-to-flour ratio affects your bread’s texture. For a simpler option, try a No yeast bread. But most traditional breads need this protein development.
- Protein content: Higher protein flours make bread chewier.
- Hydration: More water makes the crumb airy.
- Mixing: Right hydration ensures all flour is moist.
The Role of Salt and Yeast
Yeast is the heart of your bread, making it rise and flavorful. Water temperature is key. Too hot, and yeast dies; too cold, and rising takes forever.
Salt does more than add taste to your simple yeast breads. It controls yeast, preventing it from eating sugars too fast. Without salt, dough would over-proof and fall before baking.
“Salt is the silent partner in bread baking, controlling the pace of fermentation and tightening the gluten structure for a better rise.”
By balancing flour, water, yeast, and salt, you control your bread’s outcome. Once you grasp these interactions, you can achieve professional results at home without complex recipes.
The No-Knead Method Explained
The no-knead method changed my whole view on baking at home. I used to think hard work was key to making great bread. But, patience is more powerful than physical effort in making dough.
Why Kneading Is Often Overrated
Many beginners are scared of kneading dough for long. But, gluten forms naturally over time with just water and flour. Mixing these ingredients starts the bonding process without needing to knead.
Skipping kneading avoids overworking the dough. This gentle method keeps the dough’s air bubbles intact. This makes the bread light and fluffy. Using the no knead bread method also makes shaping easier.
The Magic of Long Fermentation
The secret to great flavor is long fermentation. Letting the dough rest for 12 to 24 hours breaks down starches. This creates a rich, tangy taste that quick rises can’t match.
During this time, yeast slowly produces carbon dioxide. This builds a strong, elastic dough that keeps its shape well. You can mix the dough at night and bake it the next day, fitting it into your schedule.
| Feature | Traditional Kneading | No-Knead Method |
|---|---|---|
| Effort Level | High (Manual Labor) | Low (Passive) |
| Time Required | Short (2-4 hours) | Long (12-24 hours) |
| Flavor Profile | Mild/Standard | Complex/Artisan |
| Crumb Texture | Uniform | Open and Airy |
Using this method lets you make bakery-quality bread with little effort. By trusting long fermentation, you get the best from your ingredients. It’s the best way to make sure your first loaf turns out great.
Preparing Your Ingredients for Success
The secret to great bread is in the preparation. When you bake homemade bread from scratch, the quality of your ingredients matters a lot. A tidy workspace makes the process smoother.
Choosing the Right Flour
Not all flours are the same, and your choice affects the bread’s texture. For a chewy, bakery-style texture, use bread flour. It has more protein, which helps the bread rise well.
All-purpose flour is okay, but it’s not strong enough for a hearty loaf. Bread flour gives your dough the strength it needs. This simple choice can make a big difference in your bread’s look.
Measuring Ingredients Accurately
Being precise is key for home bakers. Wrong measurements can make your dough too dry or too wet. I recommend using a digital kitchen scale for homemade bread from scratch.
Measuring by volume, like cups, can be tricky because flour packs differently. A scale helps keep your measurements consistent. Consistency is vital in baking, and it starts with accurate measurements.
Step-by-Step Guide to Baking Your First Loaf
Making easy homemade bread is easier when you know the steps. Breaking the process into parts helps avoid baking stress. Follow these steps to bake a beautiful loaf at home.
Mixing the Dough
Start by mixing flour, water, salt, and yeast into a rough dough. Don’t overwork it yet. Just make sure all flour is wet. Be patient as the ingredients need time to mix well before they start to rise.
The Proofing Process
After mixing, the dough goes into the proofing process. Place it in a warm, draft-free area. This lets yeast work its magic. It’s ready when it’s doubled in size and looks light.
Watching the proofing process is key. Too long and the dough falls, too short and it’s dense. Use a clear container to see the dough grow.
Shaping and Scoring
When it’s ready, gently turn the dough onto a floured surface. Be careful to keep the air bubbles inside. Fold the edges to make the surface smooth.
Then, score the top with a sharp knife. This helps the bread expand evenly in the oven. With practice, your easy homemade bread will look like it’s from a bakery.
Mastering the Dutch Oven Technique
Getting a bakery-quality loaf at home is all about one secret tool. A heavy, lidded pot creates the perfect setting for crusty bread that’s as good as what you buy at the shop. It traps steam, which makes the bread’s outside golden and beautiful.
Why the Dutch Oven Is a Game Changer
The main benefit of Dutch oven bread is how it mimics a pro steam-injected oven. When you put your dough in the hot, covered pot, the steam from the loaf stays inside. This lets the bread rise fully before the crust gets hard.
Consistency is the biggest plus of this method. The heavy cast iron spreads heat evenly, so your loaf bakes the same on all sides. This method is more reliable than baking on a flat sheet.
Managing Oven Temperatures
Getting the oven temperature right is key with a heavy pot. I suggest preheating your Dutch oven for 45 minutes at 450°F. This heat blast is what makes your loaf rise impressively.
To stop the bottom of your loaf from burning, put a baking sheet on the rack below the pot. This trick shields the base of your crusty bread while the top browns perfectly. After the loaf rises, taking off the lid lets the moisture out, giving it a deep, caramelized finish.
| Feature | Standard Baking Sheet | Dutch Oven |
|---|---|---|
| Steam Retention | Low | High |
| Crust Quality | Soft/Thin | Crispy/Thick |
| Heat Distribution | Uneven | Excellent |
| Ease of Use | Moderate | High |
Mastering Dutch oven bread takes patience, but it’s worth it. By controlling the heat and using the steam in the pot, you can make your home baking as good as a pro’s.
Common Mistakes Beginners Make and How to Avoid Them
Don’t worry if your first try at baking for beginners doesn’t turn out right. Every mistake is a chance to learn. I’ve had my share of loaves that didn’t rise or were too heavy. The trick is to spot these problems and fix them.

Troubleshooting Dense Bread
A dense, gummy crumb is a common issue for beginners. It often happens when the dough doesn’t ferment enough or the yeast isn’t active. If your loaf feels like a brick, here are some possible reasons:
- Insufficient Proofing: The dough needs enough time to build up gas bubbles.
- Water Temperature: Using water that is too cold can slow down yeast activity significantly.
- Flour Type: Using flour with low protein content may prevent the structure from holding air.
To fix this, make sure your kitchen is warm during proofing. Also, check the yeast’s expiration date to ensure it’s active.
Fixing Over-Proofed Dough
Sometimes, dough rises too much and becomes over-proofed. It looks deflated or feels fragile. If you poke it, the dent doesn’t spring back, which means it’s over-proofed.
If you catch it early, you can reshape the dough gently. Be careful not to lose the air bubbles. Fold the dough to build tension and let it rest for a shorter time.
If it’s too late, don’t worry. You can bake it into a flatbread or use it for focaccia. Learning to adjust to these mistakes is key for beginners. It will make you more confident in your baking skills.
Adding Flavor Variations to Your Basic Loaf
My favorite part of baking is adding fresh, aromatic ingredients to my loaves. Once you know the basics, you can try exciting flavor variations. These changes let you show off your creativity and make the bread just right for you.
To mix in ingredients well without messing up the dough, add them in the final mix. Adding them too soon can mess with the dough’s texture. Wait until the dough is almost ready to add your special touches.
Incorporating Herbs and Spices
Fresh herbs like rosemary, thyme, or sage add a great smell to your bread. Chop them finely so they spread evenly. Dried spices like garlic powder or smoked paprika can also deepen your artisan bread.
Remember, dried herbs pack a stronger punch than fresh ones. Start with a small amount, like a teaspoon, and adjust to taste. These small changes can turn a simple loaf into a fancy side dish that goes great with soups or stews.
Experimenting with Seeds and Grains
Seeds and grains add texture and a nutty taste. Sunflower seeds, poppy seeds, or toasted sesame seeds are great choices. They not only taste good but also make your bread look more rustic and professional.
Toasting your seeds lightly in a pan before adding them to the dough is a good idea. It brings out their natural oils and makes the bread taste even better. Whether you use flax, chia, or pumpkin seeds, they make every slice a special treat.
Conclusion
Baking your own loaf is a rewarding skill. It turns simple pantry staples into a culinary masterpiece. The no knead bread method is the most reliable for beginners.
It removes the stress of complex techniques. You get professional results right in your home oven.
Creating homemade bread from scratch teaches you to appreciate the subtle changes in dough texture and aroma. You gain confidence with every batch you pull from your Le Creuset or Lodge Dutch oven. This process relies on patience, not physical effort.
I encourage you to keep experimenting with different flour blends and hydration levels. Each loaf offers a new lesson in flavor development and crust texture. Your kitchen will soon become your favorite local bakery as you refine your personal style.
Share your fresh creations with friends and family to spread the joy of artisan baking. The path to perfect crust and airy crumb is open to everyone willing to try. Grab your mixing bowl and start your next batch today.
FAQ
What exactly makes this the easiest bread to make for beginners?
The no-knead method makes it simple. Using a high-hydration dough lets time work on gluten, not me. It’s a forgiving process that creates a top-notch artisan bread with little effort.
Do I really need a Dutch oven to achieve a crispy crust?
A Dutch oven is key for a crispy crust. It traps steam like a commercial oven. If I don’t have one, a heavy lidded pot works too.
Why should I choose bread flour over all-purpose flour?
Bread flour has more protein, which is important. It gives my loaves a chewy texture. While all-purpose flour works, bread flour keeps my loaf firm.
How do I know if I have over-proofed my dough?
Look for visual signs. If the dough collapses when poked, it’s over-proofed. I aim for it to be doubled in size and full of air bubbles.
Is the water temperature really that important for the yeast?
Yes, it is. Water that’s too hot kills yeast, while cold water slows rising. I use lukewarm water for a healthy rise.
What can I do if my bread turns out too dense?
Dense bread usually means wrong measurements or not enough rising time. I use a digital scale for accurate measurements and let the dough rest long enough. Patience is key.
When is the best time to add extra flavors like herbs or seeds?
Add mix-ins like rosemary or sesame seeds when mixing the dough. This way, flavors are spread evenly without deflating the dough later.